Supernova Mission 3


This article contains plot details about Galaxy on Fire.
First | Previous | Next | Last
Evacuation of Ginoya: Part 2
Rescue at Luur
After docking at Midantha station, Keith meets with Bargand Surr, who thanks him for saving the miners, and Keith volunteers for the evacuation efforts. He mention the stealth fighters to him, and also that they are too technologically advanced to be regular pirates. Surr says that they are also popping up whenever there was a rescue operation going on. He then sends Keith to Luur, another planet in the Ginoya system, where he must rescue a hundred stranded Midorians. At Keith's request, Surr also gives him a gamma shield, which protects him from the harsh gamma radiation from the supernova, and a new turret.
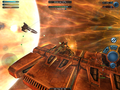
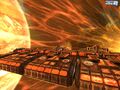
Upon arriving at Luur, it is clear that the station is taking massive damage from the supernova; it is being burnt to shreds. A freighter is near the station, ready to take the victims to safety. Captain Squand of the Midorian freighter requests that the Midorians must be evacuated from the damaged station and onto the freighter. Midorian ship will also help with the evacuation.
Stealth fighters will appear in the middle of the evacuation mission. Keith gives them a warning, but receives no reply. More stealth fighters will appear throughout the evacuation until it is finished.
After completing the mission, the stealth fighters will disperse and Keith makes contact with Surr. He speculates a connection between the supernova and the arrival of the stealth fighters. Surr then tells him that he made contact with Brent Snocom for the assistance of the Terran Fleet. Keith knows that Snocom is a good man, but Surr points out that the Terrans might want to stay out of this in order to keep the peace with the Nivelian Republic. He decides to talk to Snocom in the Alioth station.
Notes
| Recommended Weapons | |
|---|---|
| Primary Weapons | Icarus Heavy AS |
| - | M6 A4 "Raccoon" |
| - | Disruptor Laser |
| Secondary Weapons | Ksann'k |
| - | Dephase EMP or Intelli Jet |
| - | Berger SG-400 or T'Suum |
| Turrets | Skuld AT XR or HH-AT "Archimedes" |
| - | Matador TS |
| Recommended Equipment | |
|---|---|
| Shield | Fluxed Matter Shield |
| Armor | T'yol |
| Repair bot | Ketar Repair Bot II |
| Thrust | Pulsed Plasma Thrust |
| Booster | Polytron Boost |
| Cloak | Yin Co. Shadow Ninja |
| Miscellaneous | Large Cabin* |
| Repair Beams | Nirai SPP-C1 |
| Note | The ' * ' marked gear is necessary to complete the mission |
Android Users: If the game constantly crashes while trying to evacuate the Midorians, destroy every Stealth Fighter that has spawned *before* you attempt to dock with either the freighter or station landing pads. The crash only seems to occur if there are fighters alive when you attempt to dock with something. And remember, they are Stealth Fighters; make sure they're destroyed, not just cloaked. Uh also sometimes the game go black screen when you finish evacuating the midos
Cutscene
Meanwhile, back at the Thynome station...
Carla wants to contact Keith, but the intense gamma radiation makes communication in and out of the affected areas impossible. She wonders how Keith would respond to her curtain proposals, despite the supernova. She is cut off by the arrival of Professor Thadellonius Moonsprocket and Doctor Brillo Lampeter. Carla is surprised at why Moonsprocket would come back to Thynome, and warns him not to go to the space lounge. He announces that he may have some valuable information about the supernova. Lampeter, Moonsprocket's assistant and psychiatrist, is introduced, and Khador comes in the scene too.
Khador, at Moonsprocket's request, tells him that none of the stars in the Midorian sector are nowhere near old enough to explode. Moonsprocket has an answer, though he seems to have lost it. He suggests that a drink would jog his memory. Carla, meanwhile, is stressed at the fact that there's tension between Khador and Moonsprocket.
Tips
- Your gamma shield cannot take too much gamma radiation from the supernova. Focus on evacuating the Midorians and not on destroying the stealth fighters.
- Automatic turrets are recommended for this mission, although you can use manual ones while loading/unloading.
- It is highly recommended that you use a cloaking device, especially while you're loading/unloading while there are stealth fighters.
- Use EMPs to disable the stealth fighters but be careful not to hit the Midorian ships.
- Do not use Nukes to prevent destroying the Midorian ships. It is best recommended to bring Cluster Missiles or Sentry Guns for additional defense. If you are using Mines, make sure the stealth fighter is not near one of the Midorian ships, otherwise you might end up destroying them both.
- Ignore the stealth fighters, and abort the evacuation and destroy the stealth fighters if they attack either you or the Midorian ships.
- if the stealth fighters attack you, try loading some more passengers, and abort if you feel like you are taking too much damage or your ship can only take a few more hits until it's destroyed.
- Beam Laser weapons will come in handy for dealing with the cloaked ships, as they will lock on to them no matter what, but be careful where you’re aiming if there’s a friendly ship nearby, otherwise it might hit them as well.
- If you really want to get the Matador TS turret before starting the mission, here's how: if you remember you still have the Cronus you got from Khador after completing the Valkyrie storyline, then you can sell it for a million credits to buy the turret.
Gallery
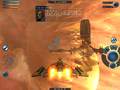
A stealth fighter is destroyed as Keith unloads his passengers.


- Supernova Walktrough
- Supernova
- GOF2
- Walkthrough
- Missions
- GOF2HD
- Ginoya